Hello World API using MuleSoft AnyPoint Platform

Dear Readers,
In the previous post, you have learned what MuleSoft is and why it is useful for the enterprise business and how it is helping us to integrate the various systems and helping the business to have everything in one place to help their employees to boost productivity and help their customers as well.
Introduction
In this blog post, we will talk about how to develop your first API and yes we will start with Hello World API which is the basics for all programming languages.
System Requirements
Like every programming language we have to do the setup, MuleSoft also has its studio which is used to develop the APIs and MuleSoft project. Below is the system requirement which is required to develop the API using the MuleSoft platform.
PC requirement
- 2GHz CPU
- 20GB free hard drive space
- 8 GB RAM ( 16 GB RAM is recommended )
System Requirement
- JDK 8 or above ( Now included with Anypoint Studio ) Or
- Zulu JDK ( Now included with Anypoint Studio )
- PostMan ( preferred ) or Advanced Rest Client for testing the API
Download AnyPoint Studio Platform
Before we start working on our first API, we need to download the required tool which is AnyPoint studio, to download the tool click on the given link and download for the required OS which you are using.
https://www.mulesoft.com/lp/dl/studio

Note: – If you see a 30-day free trial. Please do not get panicked it is a lifetime free tool that we can use. 30 Days free trial is for Anypoint cloud-based platform.
Once you have downloaded the file, please follow the below link to install the studio on Mac OS.
Link to install the Studion in Mac OS – https://docs.mulesoft.com/studio/7.10/to-download-and-install-studio-ox
To install the studio in Windows OS follow the below steps
- Extract the zip file and store it in any drive of your machine
- Navigate to the location where you have extracted the studio
- Double click on the “AnypointStudio” file to open the studio
- You will see the below screen and you can choose which location you want to store all your MuleSoft Projects


If you see the popup like below then click on the “Continue to Studio” button
Introduction to Mule Events
Before we actually start working with our first API, we need to understand a very important concept which is of Mule Event.
- A MuleEevent is something that contains the core information related to the API endpoint at the run time of the API or MuleSoft Project.
- Mule Events are immutable that means if we change the Mule event it will create a new instance of the Mule Event.
- In MuleSoft the output of one component becomes the input for the next component.
- Mule Event is consist of two-part
- Mule Message
- Variables
Mule Message is consist of two main parts
- Attributes – Attribute contains the key information about the API URL like headers, query parameters, URL parameters, the API path and etc
- Payload – Payload is the main data that we are processing through our API. For example, We are sending the array of records to create Accounts in Salesforce, the payload will contain an array of records.
Variables are the event data that a developer can create on their own to use further in the mule flow or in the mule project.
Check the below image for the complete reference

Below is the image which have the basic idea about how a mule Application looks like

Create Hello World MuleSoft Project
Once the studio is launched successfully the first step is to create the MuleSoft project. To create the project follow the below Steps.
1 – Click on the File > New > Mule Project
Provide the name of the project let’s say “hello-world-API” and click on finish.
Initially, you will see a blank canvas as you can see in the above image. As we have discusses every API is a URL that we hit either from the browser or from the code or from MuleSoft.
So, to develop our first API we need to put a listener in the canvas. Drag the Listener component from Mule Palate to Canvas. Check the below image for reference.

Once you have dragged the listener component to the canvas. It’s time to configure the listener. As shown in the above image click on the green + icon and then click on the Ok button.

Now, put /hello for the path in the listener configuration which is actually telling which endpoint or URL the API needs to hit.
Your configuration will look like below;
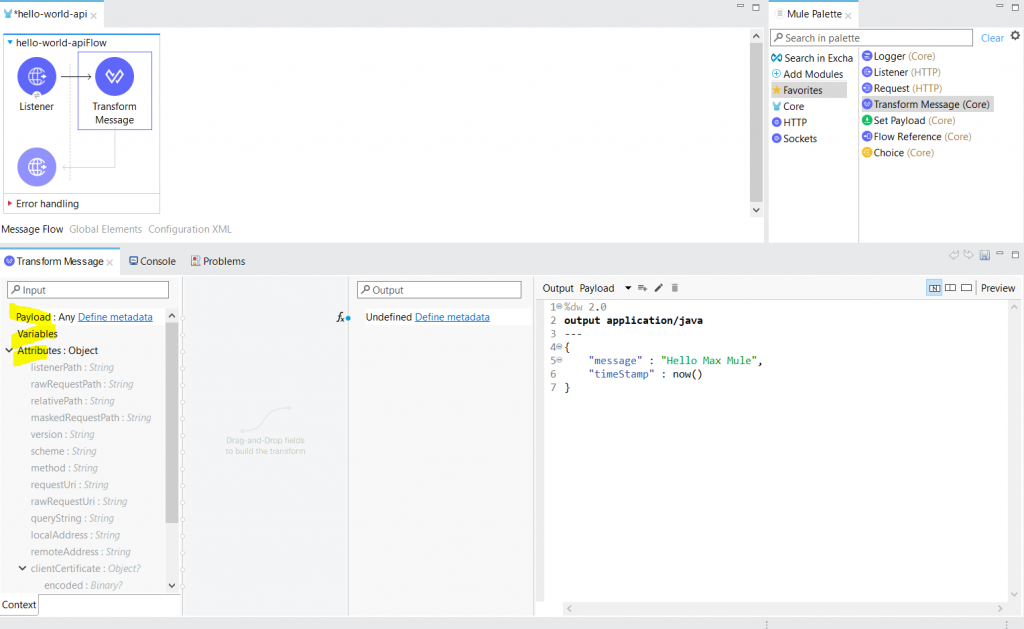
Transform message: This component is used to either transform the input to other format or used to send the response to client which is accessing the API. For example you are sending the JSON input and the target system is needed XML so in this case you will use Transform Message to convert JSON to XML.
Now drag & drop the Transform message component into the Canvas from the Mule palate. When you will drag the component make sure you are dragging under the process section.
When you will be on the Transform message, on the left you will the Mule Event with all the properties which we have discussed. Here is the Complete flow that you will see.

Below is the code which I have used in transform message.
%dw 2.0
output application/java
---
{
	"message" : "Hello Max Mule",
	"timeStamp" : now()
}
Run the Application
As we have completed the development of the API. Right click on the canvas and the Select Run Project “Project Name”. And then wait for a couple of minutes.
In the meantime, please open the Postman or Advanced Rest Client.

While running the project if you see a popup like below then click on Allow Access

You will see the deployed message like below

Test the API
To test the API, open your web service testing toll ( either postman or advanced rest client ) and then hit the URL from the postman
To prepare the URL you need to use http://localhost:YOUR_PORT_NAME/hello
YOUR_PORT_NAME is the port which you have configured in connector. To see the connector configuration. Click on listener and then edit connection. See below image

Now, our final url will be http://localhost:8081/hello
Below is the outcome from the API

Hope you have enjoyed reading and learned something.
Thanks for reading.

