Install Managed Package via Salesforce DX CLI?

Question:
I am working on a CI/CD setup using Salesforce DX CLI and Travis CI. As part of my process, I need to deploy Lightning components that depend on a managed package available in the AppExchange.
How can I install a managed package using the Salesforce DX CLI so that it integrates seamlessly with my travis.yml script? Below is my current Travis CI configuration:
sudo: true
dist: trusty
cache: false
env:
- URL=https://developer.salesforce.com/media/salesforce-cli/sfdx-linux-amd64.tar.xz
before_install:
- export SFDX_AUTOUPDATE_DISABLE=true
- export SFDX_USE_GENERIC_UNIX_KEYCHAIN=true
- export SFDX_DOMAIN_RETRY=300
- wget -qO- $URL | tar xJf -
- "./sfdx/install"
- export PATH=./sfdx/$(pwd):$PATH
- sfdx update
- sfdx force:auth:jwt:grant --clientid $CONSUMERKEY --jwtkeyfile assets/server.key --username $USERNAME --setdefaultdevhubusername -a DevHub
script:
- sfdx force:org:create -f config/project-scratch-def.json -s -a PackageInstallation
- sfdx force:org:list
- sfdx force:org:display
- sfdx force:user:password:generate -u PackageInstallation
- sfdx force:org:display
- sfdx force:org:open -u PackageInstallation
- sfdx force:source:push -u PackageInstallation
- sfdx force:apex:test:run -u PackageInstallation -c -r human
When I attempt to deploy the components, I encounter the following error:No COMPONENT named markup://ldt:datatableDev found.
How do I resolve this error and successfully install the required managed package?
Answer:
To install a managed package using Salesforce DX CLI, the method depends on whether the package is a First Generation Managed Package or a Second Generation Managed Package.
Get expert Salesforce certification guidance, interview prep, and hands-on Salesforce training in Australia—sign up for a free demo today!
For First Generation Managed Packages, use the sfdx force:mdapi:deploy command to deploy metadata.
Here’s how you can do it:
1.Create a folder named packages containing a package.xml file with the following content:
<?xml version="1.0" encoding="UTF-8" standalone="yes"?>
<Package xmlns="http://soap.sforce.com/2006/04/metadata">
    <types>
        <members>*</members>
        <name>InstalledPackage</name>
    </types>
    <version>40.0</version>
</Package>
2.Inside the packages folder, create a sub-folder named installedPackages. Within this folder, include an XML file for each package you want to install. For example, for a package with the namespace ldt, the file would be named ldt.installedPackage:
<?xml version="1.0" encoding="UTF-8"?>
<InstalledPackage xmlns="http://soap.sforce.com/2006/04/metadata">
    <versionNumber>1.61</versionNumber>
    <password>package-password</password>
</InstalledPackage>
3.Deploy the package using the following command:
sfdx force:mdapi:deploy -d packagesThis will install the managed package in the target org. If multiple packages need to be installed, include all their XML files in the installedPackages folder, and each package will be processed independently.
For Second Generation Managed Packages, use the following command instead:
sfdx force:package:install --package <PACKAGE_ID> --targetusername <USERNAME> --wait 10 --publishwait 10Replace <PACKAGE_ID> with the 15-character or 18-character package version ID, and <USERNAME> with the target org username.
To automate the installation of multiple packages with dependencies, you can create a shell script to install them in the desired order, ensuring all dependencies are resolved.
Alternative approach
Have you tried using the following command?
sfdx force:package:install -i 04t6A0000004eytQAADocumentation for this command can be found in the Salesforce CLI Command Reference.
The only requirement is to know the ID of the package to pass as the -i parameter. If you can get the package ID, you should be in good shape.

Additional Information
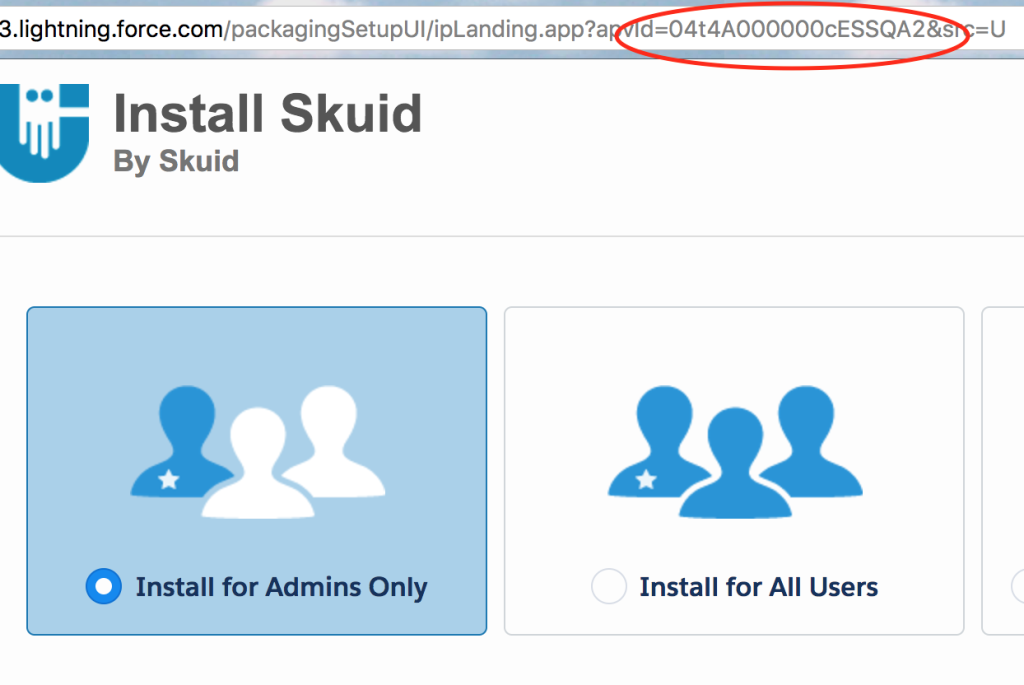
When you install an AppExchange managed package through the UI, the package ID (specifically, the package version ID) is displayed in the browser’s address bar. This is the value you need to supply to the CLI command.
Using this ID, I successfully performed the following steps:
# Step 1: Create a new project
$ sfdx force:project:create -n test-project
target dir = /Users/pchittum/Stuff/git/sfdx-pilot
   create test-project/sfdx-project.json
   create test-project/README.md
   create test-project/config/project-scratch-def.json

# Step 2: Navigate to the project directory
$ cd test-project/

# Step 3: Create a new scratch org
$ sfdx force:org:create -f config/project-scratch-def.json -s
Successfully created scratch org: 00D0v0000008eXmEAI, username: test-mffvsibtb6ly@pchittum_company.net

# Step 4: Install the package using the version ID
$ sfdx force:package:install -i 04t4A000000cESSQA2
PackageInstallRequest is still InProgress or Unknown. You can query the status using:
sfdx force:package:install:get -i 0Hf0v0000008QWdCAM

# Step 5: Query the installation status
$ sfdx force:package:install:get -i 0Hf0v0000008QWdCAM
Successfully installed package [04t4A000000cESSQA2]
Accelerate Your Career with Salesforce Training in Australia
Embark on an exciting journey into the world of Salesforce with our expertly curated Salesforce training in Australia. Designed for both newcomers and seasoned professionals, our training provides a robust foundation in Salesforce CRM. Gain hands-on experience through real-world projects and prepare for certifications like Salesforce Admin and Developer with confidence. Our industry-aligned curriculum ensures you are job-ready, equipping you with the technical expertise and practical insights needed to excel in the competitive landscape of Salesforce careers.
At the heart of our program is a commitment to practical learning, personalized mentorship, and comprehensive support for certification and job readiness. From detailed course materials to tailored interview preparation, we provide everything you need to build a thriving Salesforce career.
Don’t miss the chance to transform your professional path—join our free demo session today and unlock the door to endless opportunities in Salesforce!!!

