Salesforce Roll Up Summary – in Hindi

Hello Everyone! Mujhe ummeed hai aapka din bahut acha jaa raha hai. Aaj hum ek bahut important Salesforce feature ke baare mein detail mein seekhne wale hain — Roll-Up Summary Fields.
Ye post specially beginners ke liye hai jo Salesforce ko better samajhna chahte hain, ya phir apne daily admin/developer kaam mein time save karna chahte hain.

Explanation: Is slide mein, presentation ke main topics ko number ke saath list kiya gaya hai.
Formula Field in Salesforce: Yeh Salesforce mein formula fields ke baare mein batayega.
Lookup and Master-Detail Relationships: Yeh do tarah ke relationships ko samjhayega, jo Salesforce mein data ko jodte hain.
Rollup Summary Field in Master-Detail Relationship: Yeh topic woh hai jo pehli image mein detail mein dikhaya gaya tha. Yeh batata hai ki Rollup Summary fields sirf Master-Detail relationships mein hi kaam karte hain.

Roll-Up Summary Field Kya Hoti Hai?
Simple shabdon mein — Roll-Up Summary ek aisi field hoti hai jo Master-Detail Relationship mein child records ka data aggregate (SUM, COUNT, MIN, MAX) karke parent record par show karti hai.
SUM → Total value calculate karega
COUNT → Total records count karega
MIN → Sabse chhoti value batayega
MAX → Sabse badi value batayega
💡 Example:
Agar aapke paas Library Book (Master) aur Book History (Detail) objects. hain, toh Roll-Up Summary aapko bata sakta hai:
Kitni books sold out hui hain
Kis date pe pehli sale hui
Kitni books issue hui
Important Rule — Relationship Matters
Roll-Up Summary sirf Master-Detail relationship par kaam karta hai.
Lookup Relationship → ❌ Roll-Up Summary ka option nahi aata
Master-Detail Relationship → ✅ Roll-Up Summary available hota hai
According to Salesforce Documentation
“Roll-Up Summary ek read-only field hoti hai jo related list ka SUM, MIN, MAX ya COUNT show karti hai. Is field ko manually edit nahi kiya ja sakta, kyunki yeh auto-calculate hoti hai.”
Step-by-Step: Roll-Up Summary Field Create Karna
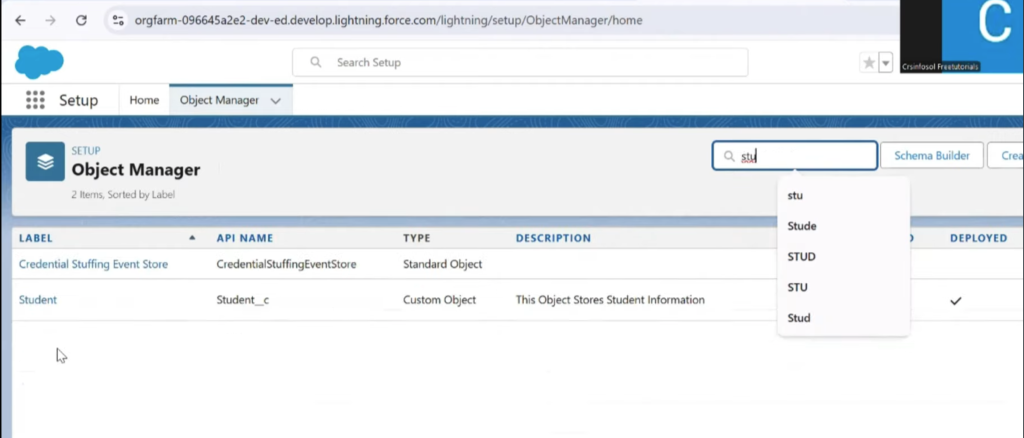
1. Master Object Select Karein
Hum Book object par kaam karenge jiska Book History ke saath Master-Detail relationship hai.
Is screenshot mein, hum Salesforce setup ke “Object Manager” section mein hain. Yahan par user “stu” type karke ek object ko search kar raha hai. Search results mein “Student” naam ka ek custom object (Student__c) dikh raha hai. Iska matlab hai ki user is presentation ke liye “Student” object par kaam kar raha hai.
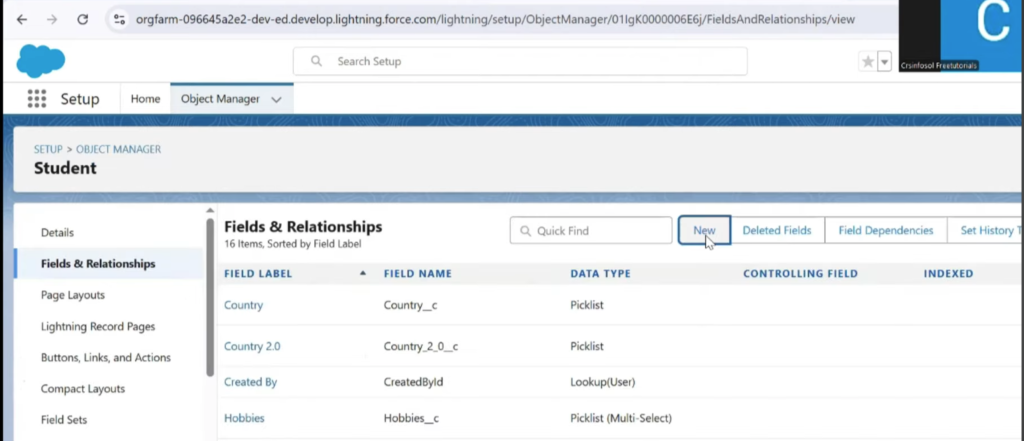
2. New Field Banayein
Data Type: Roll-Up Summary
Field Label: Record CountDescription aur Help Text add karna optional hai.
“Student” object ke andar ke “Fields & Relationships” tab ka hai. Yahan par student object ke liye bane hue fields ko list kiya gaya hai, jaise ki “Country”, “Hobbies”, etc. Upar right side mein ek “New” button dikh raha hai, jise click karke naya field banaya ja sakta hai. Isse lagta hai ki aage ke steps mein user is Student object par ek naya field create karega, shayad woh master-detail relationship ya rollup summary field hoga.


‘Student’ Object Par Field Creation
Student” custom object ke andar hain aur ek naya field bana rahe hain. Yahan par alag-alag Data Type options dikh rahe hain, jaise Auto Number, Formula, Roll-Up Summary, Lookup Relationship, aur Master-Detail Relationship. Yahan par, Roll-Up Summary field ko select karne ka option dikhaya gaya hai, lekin yeh grayed out (disabled) hai.
Iska matlab hai ki is object par abhi tak koi “Master-Detail Relationship” create nahi hua hai. Master-Detail Relationship par click karne se yeh bhi grayed out nahi hai, jiska matlab hai ki yeh option available hai. Isse yeh pata chalta hai ki aage ke steps mein pehle “Master-Detail” relationship banaya jayega.
“Book” custom object ke Details tab ka hai. Yahan par is object se judi jaankari di gayi hai, jaise iska API Name (Book__c), Singular Label (Book), Plural Label (Books), aur Deployment Status (Deployed). Iske bagal mein Fields & Relationships tab hai, jahan se fields banaye jaate hain. Yeh image bas yeh verify karti hai ki hum “Book” object par kaam kar rahe hain.
Hum “Book” object par ek naya field bana rahe hain. Yahan par Data Type list mein Roll-Up Summary ko select kiya gaya hai. Iska matlab hai ki “Book” object aur kisi doosre object ke beech already “Master-Detail Relationship” ban chuka hai.
Kyunki pehli image mein “Student” object par Roll-Up Summary field grayed out tha, isse yeh lagta hai ki “Student” object ko “Book” object ke saath detail object banaya gaya hai. Toh ab hum “Book” object par “Student” records ka data (jaise ki count ya sum) calculate karne ke liye Roll-Up Summary field bana sakte hain.

Yahan par field ko ek naam diya jaa raha hai. Field Label mein “Record Count” likha gaya hai, aur Field Name automaticlly “Record_Count” set ho gaya hai. Isse lagta hai ki aage ke steps mein yeh field “Book” object par “Student” records ko count karega aur uss count ko is field mein display karega.

“New Custom Field” wizard ke step 3 mein hain. Yahan hum Roll-Up Summary field ko set kar rahe hain.
Master Object: “Book” hai.
Summarized Object: “Book Histories” hai. Isse lagta hai ki “Book” aur “Book Histories” ke beech “Master-Detail Relationship” banaya gaya hai. “Book Histories” object hi “Summarized Object” hai, jiske records ka data hum master object (“Book”) par summarize karna chahte hain.
Select Roll-Up Type: Yahan COUNT option select kiya gaya hai. Iska matlab hai ki hum “Book” se related “Book Histories” records ko count karna chahte hain.
Filter Criteria: All records should be included in the calculation select kiya gaya hai. Iska matlab hai ki sare related records ko count kiya jayega. Agar hum chahte to kisi specific criteria ke hisaab se bhi records ko count kar sakte the.
3. Summary Object Choose Karein
Related Object: Book HistorySummary Type: COUNT (ya SUM, MIN, MAX as per requirement)

Filter Criteria ke saath Roll-Up Summary
Roll-Up Summary field ki configuration ka hi ek alag view hai. Yahan par “Filter Criteria” ka option detail mein dikhaya gaya hai. Isme Only records meeting certain criteria should be included in the calculation select kiya gaya hai. Iske neeche ek filter condition bhi set ki gayi hai:
Field: “Book Histories Name”Operator: “equals”Value: “Sold Out” Iska matlab hai ki ab sirf woh “Book Histories” records count honge jinka Book Histories Name field “Sold Out” ke barabar hai. Yeh ek specific use case ke liye bahut useful hai, jaise ki sirf bik chuki kitaabon ka count nikaalna.
4. Filter Criteria Lagayein (Optional)
Agar aapko sirf specific records count karne hain, filter lagaiye.
Example:
Book History Name equals 'Sold Out'
Iska matlab sirf Sold Out books count hongi.

New Custom Field” wizard ka step 4 hai, jahan hum field-level security set kar rahe hain.
Field Label: “Record Count”
Data Type: Roll-Up SummaryField Name: Record_Count Is screen par, aap alag-alag user profiles ke liye is field ki visibility (Visible) aur access (Read-Only) define kar sakte hain. Agar aap kisi profile ke liye Visible tick nahi karte, toh woh field us profile ke users ko dikhayi nahi dega. Kyunki Roll-Up Summary fields calculation ke liye hote hain, inki values user dwara edit nahi ki ja sakti, isliye yeh hamesha Read-Only hote hain.

Hum “New Custom Field” wizard ke aakhri step, Step 5: Add to page layouts par hain.
Field Details: Upar field ke details, jaise Field Label (Record Count) aur Data Type (Roll-Up Summary), dikh rahe hain.
Page Layout Selection: Neeche ek checklist hai jahan user ko Book Layout naam ka page layout select karna hai. Iska matlab hai ki jo naya Record Count field banaya hai, woh “Book” object ke is page layout par add ho jayega.
Final Action: Is step ko complete karne ke baad, user Save ya Save & New par click kar sakta hai. Save karne se field ban jayega aur wizard close ho jayega. Save & New karne se field save ho jayega aur ek naya field banane ka process phir se shuru ho jayega.
Yeh image tutorial ke aakhri step ko dikha rahi hai, jahan Roll-Up Summary field ko finally user interface par dikhane ke liye configure kiya ja raha hai. Iske baad hi user “Book” records par is field ko dekh payenge.

Hum “Book” object ke fields ko dekh sakte hain. Yahan ek naya field Record Count (Record_Count__c) successfully create ho chuka hai. Iska Data Type Roll-Up Summary (COUNT Book Histories) hai. Isse yeh saaf pata chalta hai ki is field ka purpose Book Histories object ke records ko count karna hai. Ab jab bhi koi naya Book Histories record is Book ke saath jurega, to yeh Record Count field automatically update ho jayega.
Ek naya “Book” record create kiya ja raha hai. Ismein Serial Number (54536) aur Student Name (Smantha) fields bhare ja rahe hain. Student Name field Student object ke saath Lookup Relationship se जुड़ा हुआ है. Form fill karne ke baad, Save & New button par click kiya ja raha hai. Iska matlab hai ki aage ke steps mein yeh record save hoga aur fir iske related records ko create kiya jayega.

Ek naya “Book” record (54536) successfully create hone ke baad, uski details screen par dikh rahi hain. Left side mein Related aur Details tabs hain. More dropdown mein Book Histories ka option dikh raha hai. Yeh dikhaata hai ki “Book Histories” object “Book” object se related hai, jaisa ki humne Roll-Up Summary field banate waqt dekha tha. Is par click karke, is Book record se related Book Histories records ko dekha aur create kiya ja sakta hai.

Ek naya Book record (54637) dikh raha hai. Is record ke Related tab mein Book Histories ke neeche do records dikh rahe hain – “In progress” aur “Sold Out”. Roll-Up Summary field ki configuration mein humne COUNT select kiya tha, aur isliye is Book ke liye do Book Histories records hain. Is image mein Roll-Up Summary field ki value dikh nahi rahi hai, lekin related list mein do records dikh rahe hain.
5. Save and Test
Field save karke visibility settings configure karein.
Ab Book History object pe kuch records create karke result check karein (Sold Out, In Progress, etc.)
Parent Book record pe jaake check karo — count automatic update ho jayega.

Is screenshot mein, ek aur Book record (54637) dikhaya gaya hai. Details tab mein Student Name (George) ke neeche ek naya field Record Count dikh raha hai. Iski value 1 hai. Isse yeh saaf pata chalta hai ki is Book record se related sirf ek “Book Histories” record hai jo hamare filter criteria (shaayad ‘Sold Out’) se match karta hai, aur isliye Roll-Up Summary field ki value 1 hai. Yeh Roll-Up Summary field ke working ko confirm karta hai.
Demo Example
Book Create: Serial No — 54637637 (Student: Samantha)

Book History Records:
Sold Out (Samantha)
Sold Out (George)
In Progress (Samantha)
Roll Up Summary “Sold Out” filter ke saath:
Book 54637637 → Count = 2 Sold Out books
Agar ek aur Sold Out add karte hain, count auto-update ho jaata hai.
Benefit — Hazaaro records ho, Salesforce automatically calculation karega. Manual count ki zarurat nahi.
Real-Life Benefits
Time Saving — Manual calculation ki zarurat nahi
Error-Free — Data hamesha accurate hota hai
Automation Friendly — Reports & dashboards ke liye perfect
Business Insights — Sales, inventory, performance sab measure kar sakte ho
Key Takeaways
Roll-Up Summary sirf Master-Detail par kaam karta hai
COUNT, SUM, MIN, MAX available calculations hain
Filter criteria se data ko aur targeted banaya ja sakta hai
Field read-only hoti hai, Salesforce automatically update karta hai
Conclusion
Roll-Up Summary Salesforce ka ek simple but powerful feature hai jo data aggregation ko easy aur error-free banata hai.
Agar aap large datasets handle karte ho ya frequent aggregations chahiye, toh yeh feature kaafi time save karega.
Agar aap Master-Detail relationships ka use karte ho, toh Roll-Up Summary aapka best friend ban sakta hai. Aap bhi try karke dekho aur apne workflows ko simplify karo!

